🟩 Phase 1: Command Blocks
Your First Step into Minecraft Programming!
Welcome to Command Blocks!
Command Blocks are special blocks in Minecraft that let you run commands automatically. They're perfect for beginners because:
- ✅ They work right inside Minecraft - no extra software needed!
- ✅ You can use them on Nintendo Switch, PC, or any Bedrock Edition device
- ✅ You see results immediately
- ✅ They teach you the basics of programming logic
Getting Started
Step 1: Enable Cheats
Command blocks only work when cheats are enabled. Here's how:
- Open Minecraft Bedrock Edition
- Create a new world or open an existing one
- If creating new: Toggle "Activate Cheats" to ON before creating
- If existing world: Pause game → Settings → Game → Toggle "Activate Cheats"
Step 2: Get Your First Command Block
You can't find command blocks in creative inventory - you need to give them to yourself using a command!
How to use this command:
- Press T (on PC) or the chat button (on console) to open the chat
- Type the command exactly as shown above
- Press Enter
- A command block will appear in your inventory!
/give- The command to give items@s- Means "yourself" (the person running the command)command_block- The item you're giving yourself
Your First Command Block Program
Project: The Teleporter
Let's create a simple teleporter that moves you to a different location when you press a button!
What You'll Need:
- 1 Command Block
- 1 Button (any type)
Step-by-Step Instructions:
1. Place the Command Block
- Find a spot in your world
- Place the command block on the ground
- Right-click (or interact) with the command block to open its interface
2. Configure the Command Block
In the command block interface, you'll see several options:
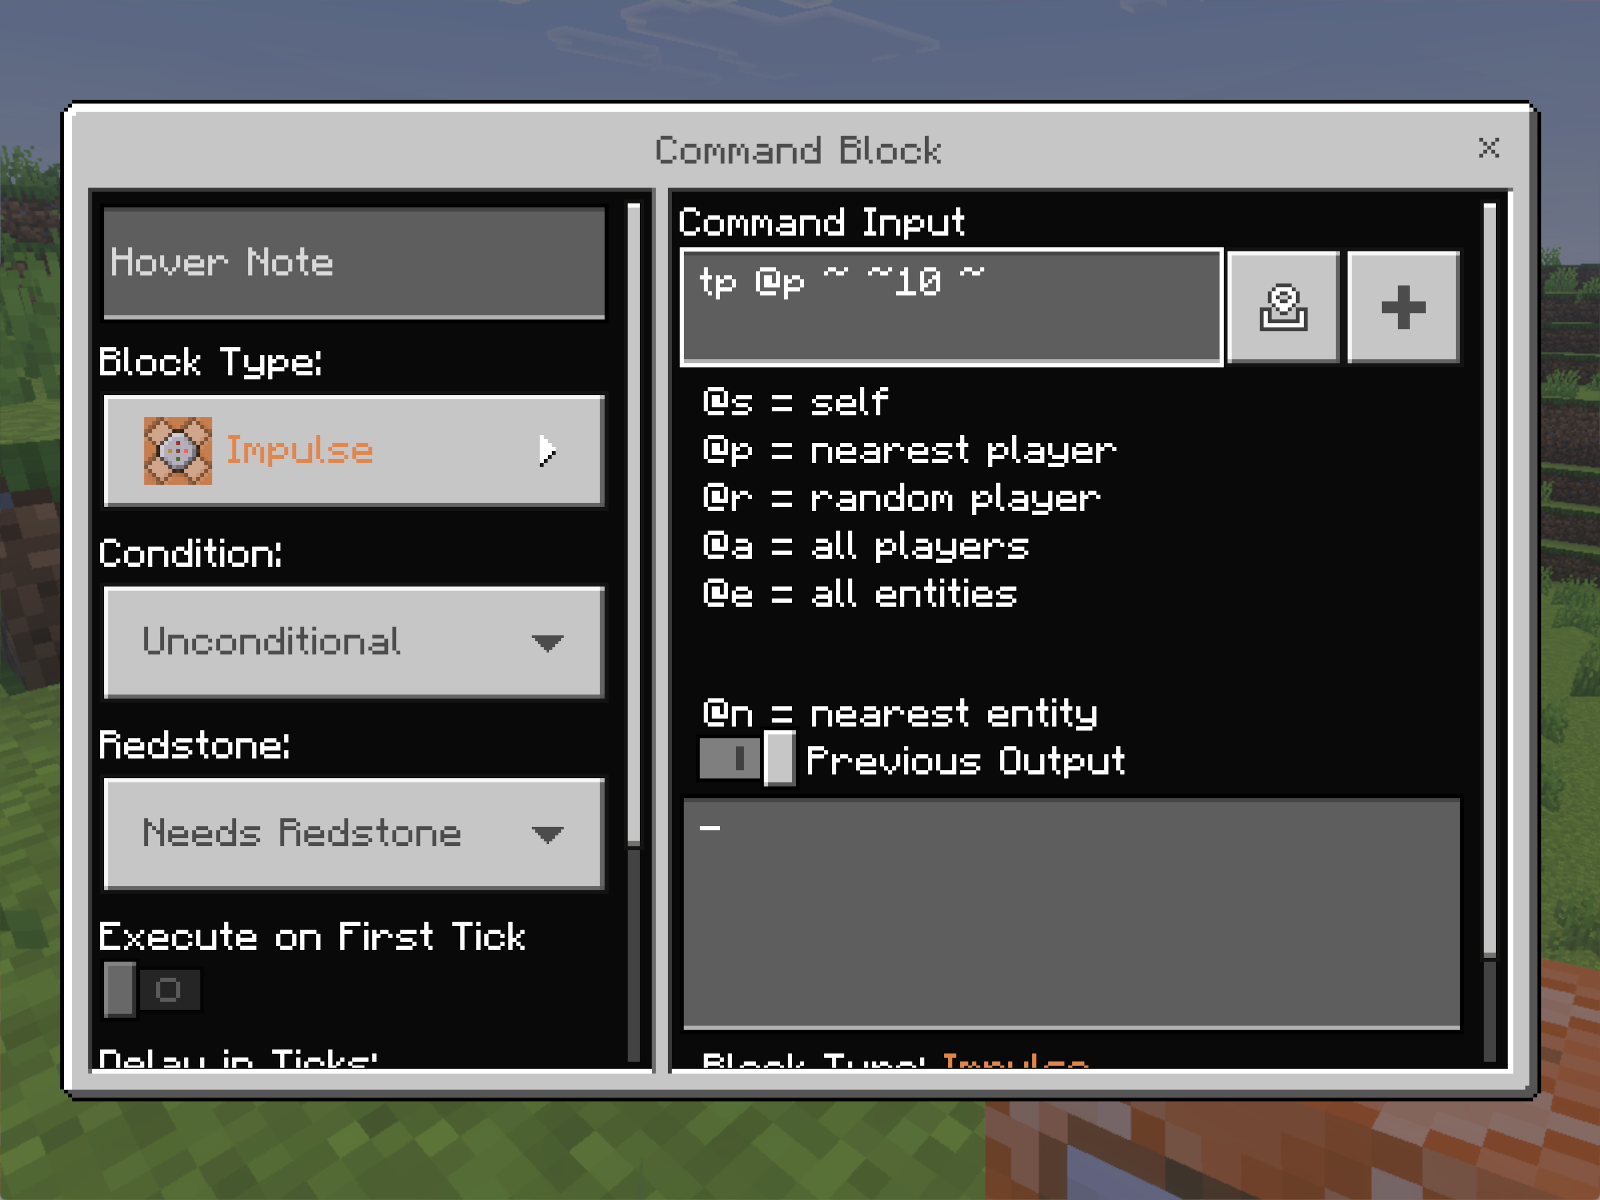
Condition: Set to "Unconditional" (it always runs)
Redstone: Set to "Needs Redstone" (it waits for a button press)
3. Enter the Command
In the command input box, type:
tp- Short for "teleport"@p- Means "nearest player" (probably you!)~- Means "current position"~10- Means "10 blocks up from current position"~- Current position (no change in Z direction)
So this command says: "Teleport the nearest player 10 blocks straight up!"
4. Add a Button
- Place a button on the command block or next to it
- Press the button
- You should teleport 10 blocks up! 🚀

- Input: The button press
- Processing: The command block executing the command
- Output: Your character teleporting up
Understanding Coordinates
To make cooler teleporters, you need to understand coordinates. Minecraft uses three numbers to describe every position:
- X: East (positive) or West (negative)
- Y: Up (positive) or Down (negative) - height!
- Z: South (positive) or North (negative)
Two Ways to Specify Positions:
1. Absolute Coordinates
This teleports you to the EXACT position X=100, Y=65, Z=200 in the world.
2. Relative Coordinates (using ~)
This teleports you RELATIVE to where you are now: 5 blocks East, same height, 3 blocks North.

More Fun Commands to Try
Give Yourself Items
Gives the nearest player 64 diamonds. You can change "diamond" to any item and "64" to any number!
Change the Time
Sets the time to daytime. Try: night, noon, midnight
Change the Weather
Makes it sunny. Try: rain, thunder
Summon Mobs
Spawns a pig at the command block's location. Try: cow, sheep, zombie
Fill Areas with Blocks
Creates a 5×5×5 cube of stone. Great for building!
Advanced: Chaining Command Blocks
You can make command blocks run in sequence - this is just like writing a program with multiple steps!
Project: The Ultimate Teleporter
Let's make a teleporter that gives you a message, plays a sound, AND teleports you!
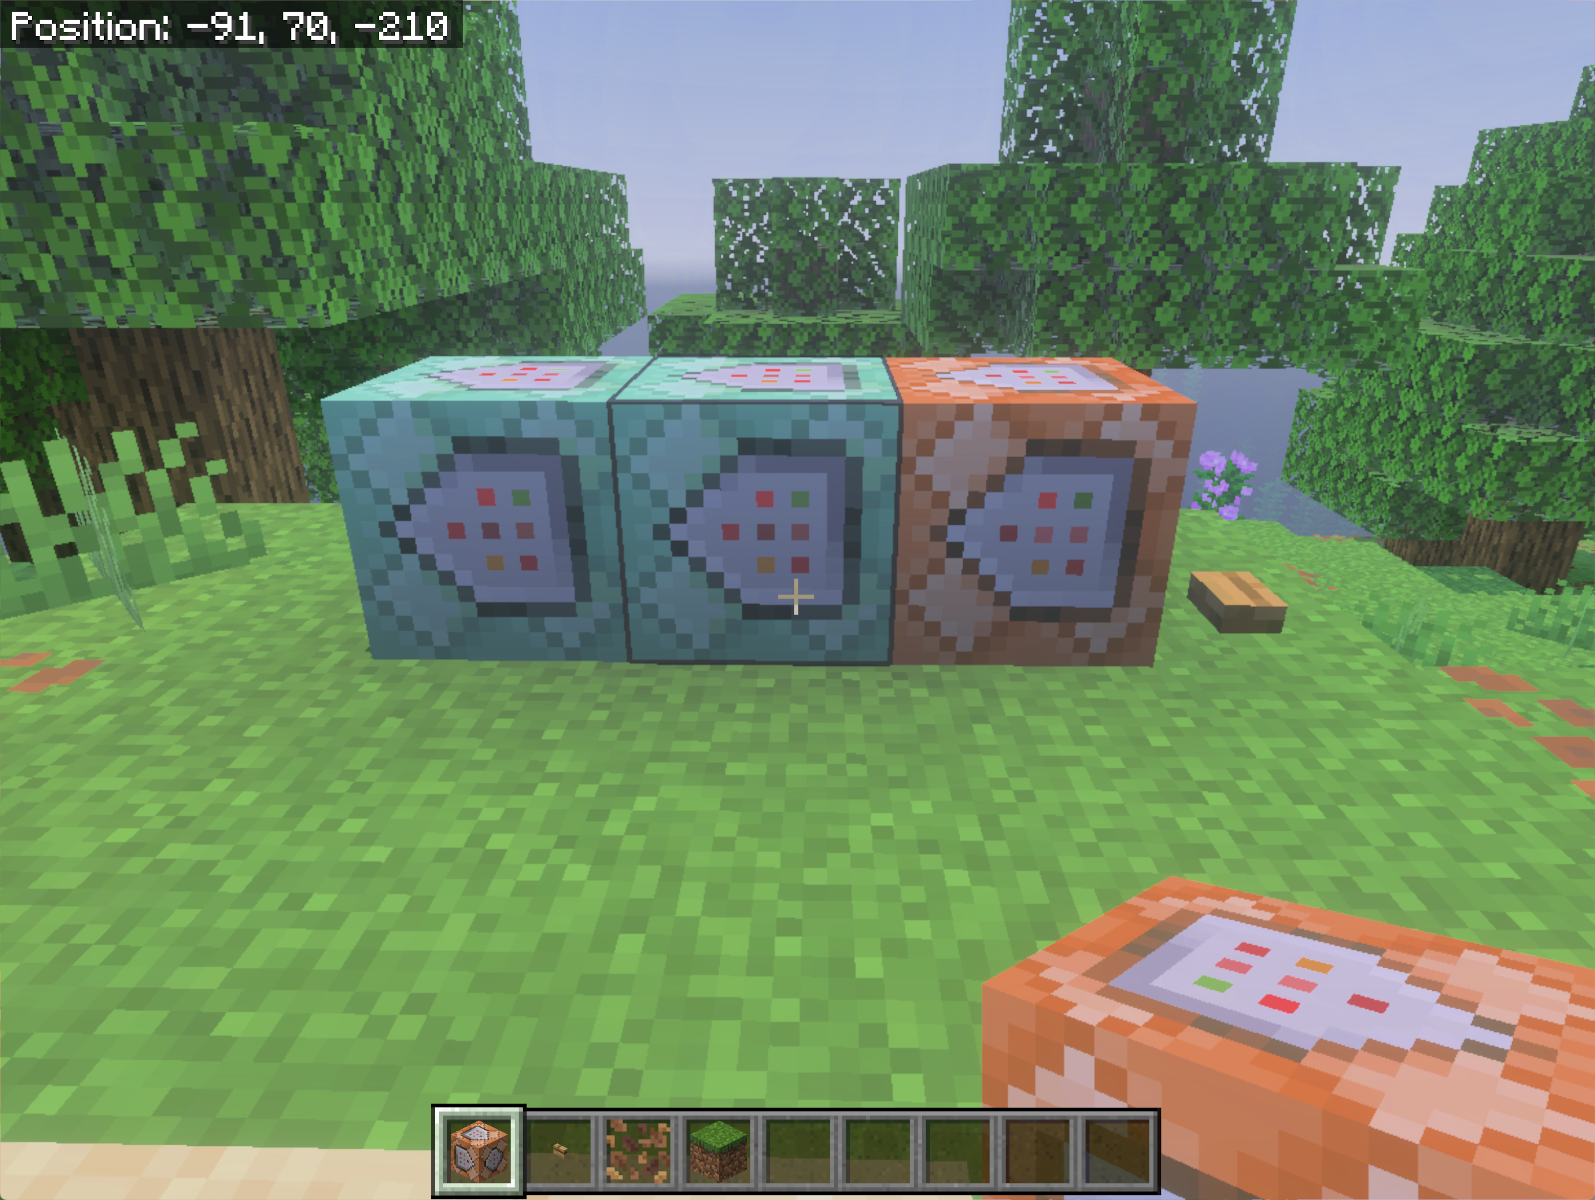
- Place 3 command blocks in a row (Command Blocks in series must point in line to the next one to be triggered)
- Set the first one to: Impulse, Needs Redstone
- Set the next two to: Chain, Always Active
Command Block 1 (Impulse):
Command Block 2 (Chain):
Command Block 3 (Chain):
Put a button on the first command block. When you press it, all three commands run in order!
Challenge Projects
Now that you know the basics, try these challenges:
Easy Challenges:
- Home Button: Create a button that teleports you to your house coordinates
- Day/Night Switch: Create buttons to instantly change between day and night
- Item Shop: Create buttons that give you different items
Medium Challenges:
- Mob Spawner: Create a button that spawns 5 different friendly animals
- Instant House: Use the /fill command to build a simple house instantly
- Treasure Hunt: Place multiple teleporters that take you to different locations
Advanced Challenges:
- Minigame Arena: Create a teleporter to an arena, then use /fill to create walls
- Weather Control Room: Create multiple buttons for different weather and time settings
- Elevator System: Create teleporters that go to different "floors" in a building
Target Selectors - The Power of @
You've seen @p and @s, but there are more! These are called "target selectors":
@p- Nearest Player@s- Self (yourself)@a- All Players (everyone on the server!)@r- Random Player (picks someone randomly)@e- All Entities (players AND mobs)
Examples:
Teleports EVERYONE 20 blocks up - great for getting everyone's attention!
Gives a random player a diamond - fun for games!
Removes all zombies - notice the [type=zombie] filter!
Tips & Troubleshooting
Common Mistakes:
- Typos: Commands are case-sensitive and spelling matters!
tpworks,TPdoesn't. - Spaces: Make sure you have spaces in the right places:
tp @p ~ ~ ~nottp@p~~~ - Quotes: If a command doesn't work, try not using quotes unless they're needed for text with spaces
Debugging Tips:
- Turn on "Command Block Output" in game settings to see error messages
- Test commands in chat first (press T) before putting them in command blocks
- If a chain isn't working, make sure blocks are touching and facing the right direction
- Remember: Impulse blocks need redstone, but Chain blocks set to "Always Active" don't!
What's Next?
🎉 You've Completed Phase 1!
You've learned the basics of:
- ✅ Commands and syntax
- ✅ Coordinates and positioning
- ✅ Sequential execution (making things happen in order)
- ✅ Target selectors and filtering
When you're ready to level up, move on to Phase 2: MakeCode where you'll learn visual programming and be able to create even more amazing things!